
Category: Geometry

  • Plant Angles

    Although the butterflies are the stars of the show in the Texas Discovery Gardens, they’re not the only interesting and beautiful things you’ll see there. There’s also a breathtaking array of different plant species, some of which you’re not likely to see in everyday life. There’s a wide enough range of species that you can go on a mission to uncover a secret that underlies many plants around the globe.

    Your mission, should you choose to accept it, is to measure the angle between successive leaves around the stalk of different plants. There are lots of different plants to try. To clarify the mission, you’re not looking for the angle between branches or between a leaf and a branch. Instead, you should try to look straight down the stalks of various plants, and measure the angle between the directions that two successive leaves stick out radially from the axis of the stalk. I’ve marked the different kinds of angles in these photos from the Center, so you can better see what is meant.

    When you’ve taken a number of measurements, what do you notice? Are any angles more common than others?

    You should observe that angles around 137 or 138 degrees are the most common. Why that number? Is there anything special about that angle?

    It turns out there is! What are the leaves there for? To catch sunlight for photosynthesis, which feeds the plant. Imagine that the angle between successive leaves was 90 degrees, a right angle. Then there would be just four orderly rows of leaves, stacked up right on top of each other, and they would block each other from the sun. So that would be an extremely bad angle. 90 degrees being bad suggests the question of whether there is a best angle, where the leaves on average overlap the least? And indeed there is. Using some geometry and other math, you can prove that there is an ideal, least-overlap angle, and that that angle is between 137 and 138 degrees. So the plants have naturally evolved to “discover” that ideal angle. This is a case of a basic mathematical principle dictating the structure of millions of life forms on earth. And the story gets even more interesting — it turns out that angle is closely related to the Fibonacci numbers (1,1,2,3,5,8,13, and so on, where each number is the sum of the previous two) and so can help explain why when you pick up a pineapple or sunflower or pinecone, there are usually a Fibonacci number of spirals to its seeds.

  • Butterfly Shapes II

    Turning from the shape of a butterfly’s path through the air to the shape of the butterfly itself, what do you notice about the shapes of the creatures you see all around you in the air?

    First, it might strike you that there are so many different shapes! It seems as though every kind of butterfly is different. How can different butterflies produce such different shapes? It seems as though we ought to count the number of wings on different butterflies, because one way we might explain different shapes is by different numbers of wings.

    However, if you look carefully all the butterflies around you, you will discover that they all have exactly four wings. In fact, every type of butterfly in existence has four wings. So there must be some other way they achieve such shape variation.

    As you look at more butterflies, though, you will start to see certain patterns that recur, similarities among those differences. Can you find some examples?

    A first, and mathematically important one, is symmetry. If you imagine a line through the middle of any healthy butterfly, the left and right sides are identical, just one is flipped the other way from the first. That type of pattern is called mirror or bilateral symmetry, and you will see it over and over again in the natural world.

    There are other more detailed patterns in the shapes of butterfly wings. You may notice that they tend to be divided into sections by the veins in the wings, and those sections tend to have a similar arrangement in different types of butterflies. For example, you may notice that there tends to be an oval section in the middle of most wings, surrounded by fairly straight sections that proceed out to the edges of the wings.

    That basic structure allows you to notice some more things. For example, many types of butterflies have “tails,” or long protrusions on the back of the wings. And those tails generally seem to come from the third or fourth sections of the back wings being longer than on other butterflies that don’t have tails.

    And that observation provides an essential clue about the overall shape variation of butterfly wings: by changing the lengths of all of the different sections, the basic structure of a butterfly wing can produce thousands of different shapes. See if you can figure out the “instructions” for producing different butterfly wings, in terms of stretching or compressing different sections of the wing.

  • Butterfly Shapes I

    As you walk through the butterfly room of the Texas Discovery Gardens, take time to slow down and notice what’s going on in the space around you. What do you notice about the flight of the butterflies? I spent some time watching the different flight paths used by different butterflies. What shapes of paths in the air do you see?

    If you’re like me, you probably noticed that when a butterfly is flapping its wings, the path is usually very erratic, darting this way and that. But does a butterfly have to fly erratically? No, if you watch for a while, you can find times when they flay in more regular paths. So why would they fly so erratically?

    That question leads us to the topic of extrapolation. If you knew that someone had drawn a shape and erased part of it and what was left looked like this:
    how might you try to complete the shape? You would probably draw something like this:

    On the other hand, if what was left looked like this:
    you’d really have no idea how to complete the shape. It could turn out to be any of thousands of different paths.

    How does this relate to the butterfly’s flight? Well, who might want to figure out where the butterfly’s path will take it? Who would be interested in where the butterfly would end up? Maybe something that wanted to eat it? Butterflies are not big or strong, and they are easy to spot amidst the plants. So they need other defenses, and the erratic geometry of their flight is one: they make it very difficult for predators to extrapolate their paths and intersect with them to catch them. So mathematics can be useful, even to a butterfly!

    If you look at their non-erratic flight, you can also see another mathematically interesting shape. You’ll notice that sometimes they glide in straight lines, but that they also glide in curved paths. In these curved paths, they tend to go around in a circle when viewed from above, while also gradually descending. This kind of curve, that curves like a circle while descending (or ascending), has a special name in mathematics. It’s called a helix and it’s a shape we can see in many places around us: the handrail of a circular staircase, the thread of a screw, the rail of some roller coasters, and more. It’s also a kind of flight pattern that occurs spontaneously over and over: in nature, like the path of a spinning seed falling from a tree, or in man-made flying objects, as this illustration from the Federal Aviation Administration’s handbook for glider pilot’s shows.

  • Lazy Bees

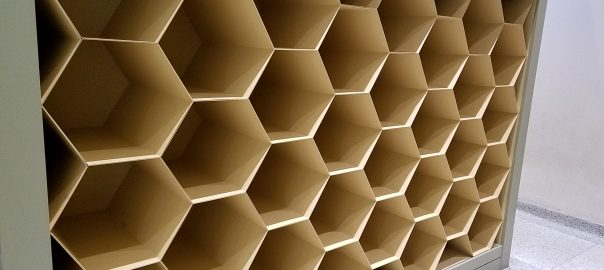
    In the foyer of the Texas Discovery Garden you will likely notice this wall of cubbies.

    What does it remind you of? A honeycomb, of course! But did it ever occur to you to wonder why bees build honeycombs in the shape they do? It turns out there is a simple mathematical reason that they do.

    To understand this, try the following activity. You need twelve short straight items, like matchsticks or pins — it doesn’t really matter what, as long as they are straight and all the same length. Print out this rectangle, scaled so the long side is exactly four times the length of your sticks. Now, try to lay your sticks flat in the rectangle, to satisfy the following three rules:

    1. Each end of each stick is touching one of the sides of the rectangle or the end of at least one other stick.
    2. The rectangle is divided into seven regions by the sticks.
    3. No region formed is less than half the area of any other region formed.

    You should work on it for a while before you look at the solution — it’s fun to try to come up with it on your own. But whether you discover it or you peek, one of the amazing facts about this puzzle is that there is only one way to do it, and in that one way, you must create a hexagon, two half-hexagons, and four three-quarter hexagons.

    The reason for that is that there’s not enough total length to your twelve sticks to divide the rectangle any other way, because it turns out that the most efficient way — the way that uses the least total length of line segments — to divide an area up into many equal-sized regions is to split it up into hexagonal shapes. In other words, over the course of evolution, honeybees have figured out the way to construct their honeycombs that requires the least wax and therefore the least work. That’s what the title of this post means — honeybees have found the unique way to do the least amount of work to build their hives, which you could maybe think is a little lazy, couldn’t you?

    And in fact, honeybees have done even better than I’ve mentioned so far. They build their hives in three dimensions, not two, and they make their honeycombs in double layers, so there are cells with openings on either side. If you look at how the bottoms of the cells are constructed, each consists of three small flat facets, and the facets of the cells from one side interlock perfectly with the facets from the other side. Mathematicians have determined that this configuration is also the most efficient way possible to construct a double layer of cells in three dimensions — something honeybees have “known” for millenia!

  • Towering Gold

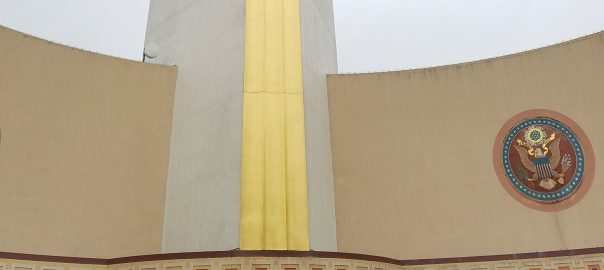
    Perhaps the most eye-catching feature of Dallas Fair Park is the gold-leaf wrapped Tower Building. Yes, that is real gold!

    Because of the allure and attraction of gold, our first math walk stop in Fair Park will be to ask, “How much is all of that gold on the Tower Building worth?” Before we go through the calculations, stop and take a moment to guess. Is it 1,000 dollars worth of gold if we crumpled it up into a solid nugget of gold? $10,000? A million dollars? Let’s figure it out.

    Since gold leaf is gold spread out thinly over an area, we need to figure out the surface area of the building that is covered by gold. We will model the front of the tower as a giant rectangle, the front of the eagle as another rectangle (which is of course a rough approximation, but it’s a small percentage of the entire gold area), and each wing as another rectangle. So we just need the dimensions of each rectangle.

    To estimate these dimensions, we can start with the height of the tower from the top of the frieze depicting the history of Texas to the feet of the eagle. We see that it is divided into nine vertical sections that appear to be equal in height. So we will focus on measuring the height of one of these sections, in particular, the bottommost section.

    If you stand dead center in front of the building, you will notice as you walk toward the building or away from it that when you are very close to the building, the frieze section appears taller than the first gold section above it, but when you are very far from the building the gold section appears taller. Move back and forth until you get to a spot where the two sections appear to be exactly the same height (lining a pencil up at about arm’s length so that it appears to match one of the sections in height and moving it up and down to compare to the other section can help).

    Once you’ve found such a spot, measure the distance to the center of the front wall of the building, and measure the height of the frieze directly with a measuring tape. (I get that the frieze is eleven feet high and that if I stand 22 feet away, the sections appear to be the same height.)

    Now take a look at the following diagram — it’s a vertical cross-section of the situation where your eye is at the point marked “I.” The fact that the two sections appear to be the same height means exactly that the two angles labeled theta are the same. Now with just the two dimensions and a little trigonometry, we can figure out the unknown height of the gold section. If you’ve learned some trigonometry, see if you can work it out.

    Here’s one way, in which we’ve cut the lower triangle in half with a horizontal line:

    The angle theta/2 has to have tangent 5.5/22 feet, so it is about 14 degrees. Therefore, angle MIA is about 42 degrees, and so leg MA is 22 feet times the tangent of 42 degrees, or about 19.8 feet. Therefore, the gold section BA is 19.8 – 5.5 = 14.3 feet, which we will round to 15 feet for ease of calculation (and because our eyeballing and measuring was very approximate, and the architect was more likely to use round numbers of feet for key measurements of the building).

    So the front section of the tower is roughly 9×15=135 feet tall, and we can directly measure how wide it is at the base. I got that it’s about 7 feet wide, but you should make your own measurement.

    Now, what about that eagle? We’ll just guess that it’s the same height as one vertical section of the tower; that shouldn’t be too far off. So we’re modeling the front of the eagle as another 15 foot by 7 foot rectangle, and the wings as 15 feet high. So all that remains is the length of the wings, which is the horizontal dimension of the two sides of the tower.

    But look closely at the sides of the tower. You will see a faint rectangular grid, with that horizontal dimension three and a half boxes wide. Moreover, two of the boxes side by side appear to form a square! It’s like the builders wrapped the building in graph paper to help us. Therefore, the horizontal dimension we want is 3.5/2 times the height of one vertical section, or about 27 feet.

    Adding up all of the sections of gold, there are 135×7 + 15×7 + 15×27 + 15×27 = 1,860 square feet of gold leaf on the building.

    How much gold does it take to make 1,860 square feet of gold leaf? Searching the internet, we can find one resource that tells us that 1000 “leaves” of gold cover 79 square feet  and weigh up to 23 grams. Dividing, the 1,860 square feet we need to cover would need 1,860/79 or about 23.5 groups of 1,000 leaves, which would therefore weigh 23.5×23, or about 542 grams.

    How much is that much gold worth, if it were crumpled up into one big nugget? To get that answer, we have to convert 542 grams into the unit that gold is bought and sold in: the troy ounce. A troy ounce consists of 31.1 grams, so the gold we’d need to cover the Tower Building would weigh 542/31.1, or approximately 17.43 troy ounces.

    To finish off, as of the time of this writing gold has been trading in a range around $1,300 per troy ounce for the past year. Therefore, the raw value of the gold on the Tower building is about 17.43×1,300, or $23,000. Is that more or less than you guessed? If it’s less, then it’s probably because gold leaf is so incredibly thin. By comparison, enough household aluminum foil to cover the Tower Building would weigh about 6,700 grams, or over twelve times as much. Combining that with the fact that gold is over seven times more dense than aluminum tells us that gold leaf is almost 100 times thinner than aluminum foil — yet it’s strong enough to last centuries on the outside of buildings!


  • Isosceles Esplanade

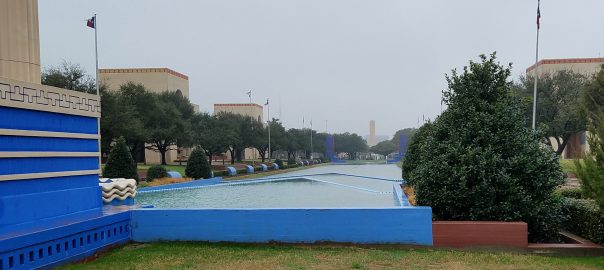
    Perhaps your stroll around Dallas Fair Park brings you to the Esplanade, a stately reflecting pool between Centennial Hall and the Automotive Building. The designers of the Esplanade for the 1936 World’s Fair had a difficulty, however: one end of the Esplanade is five to ten feet higher than the other, and of course water won’t stay with a slanted top; it always finds its level. So they had no choice but to install  some retaining walls (in this case, two) between one end of the Esplanade and the other, dividing the pool into three separate sections. Water flows over one of the retaining walls, creating a pleasant cascade.

    Rather than choosing to build the walls straight across the Esplanade, the designers chose to angle the walls, creating two long, sharp triangles pointing away from one end of the Esplanade and leading the eye toward the fountain in the lowest section of the pool. Looking at these triangles, it looks very likely that the two sides of each triangle are the same length, making them a special kind of triangle called an isosceles triangle.

    Looking at the resulting vista, one question that comes to mind is whether the engineers made the two triangles the same shape or not. The first thing to notice is that they can’t literally be identical shapes, because as you can see in the picture above, the nearer triangle is inset horizontally (along the shorter dimension of the pool) from the farther triangle. In other words, the base of the nearer triangle is shorter than the base of the farther triangle.

    But when we talk about things being the “same shape,” we don’t usually mean that they are identical. For example, in the usual sense, all squares are the same shape, but there are certainly different sizes of squares.

    Instead, what we usually mean when we say two things are the same shape is that you could scale one up to the size of the other and then the shapes would be identical. (The specific math word used for this is that the shapes are similar.) How can we tell if the two isosceles triangles in the Esplanade are similar?

    A little geometry tells us that two isosceles triangles are similar if their vertex angles (in this case, the “pointy ends”) are equal. So if we had a giant protractor and could set it down on those two points, we could figure it out. But unfortunately, we don’t have a giant protractor, and those two points are stuck in the middle of the pool; there’s no way to get to them without taking a swim (and breaking Fair Park rules)!

    To take a different approach, if those angles are equal, then the sides of the lower triangle will be parallel to the corresponding sides of the upper triangle. And in the photo above they do look parallel. So can we be sure? It looks pretty good even from another view:

    However, to be really sure, we should go back to the very definition of “similar:” every dimension of the two shapes should be in the same proportion. To check this, we should pace out the “horizontal” (along the short side of the pool) and “vertical” (along the long side of the pool) dimensions of each of the two walls. If you take equal-sized steps, you can just count your steps along the edges of the pond from when you are opposite one end of the wall until you are opposite the other. To get the short dimension, where the far, pointy end of the triangles are blocked from view by the tower on the left of the pictures, remember that those points of the triangles are lined up with the center line of the pool (and don’t forget that the farther wall extends farther to the left and right of the tower than then near wall — make sure you’re lined up correctly when you are pacing them off).

    When you have the two counts for each of the walls, divide the “vertical” count by the “horizontal” and see if you get the same quotient; that’s the definitive test of similarity. Give it a try!

  • Calatrava “Wave”

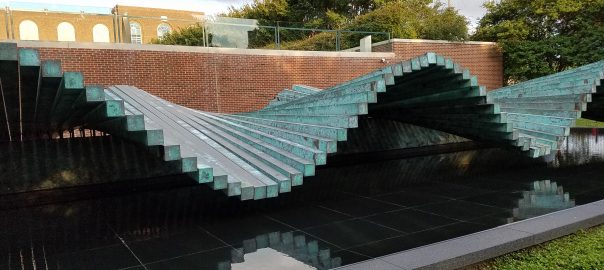
    Another three quickies, this time about the iconic sculpture “Wave” by Santiago Calatrava. (1) Is this sculpture curved or straight? (2) Is it symmetric? (3) How did Calatrava get each one of the copper beams to stay at the particular angle it sits at?

    Again, it’s best to give participants time to chew on these questions and generate their thoughts. Then you can bring everyone together to see if there’s consensus. Here are my thoughts. (1) This sculpture is both curved and straight! It’s a remarkable fact that there are truly curved surfaces that can be broken up completely into a collection of individual straight lines. Such surfaces are called ruled surfaces, and they have been the subject of much mathematical study. This “wave” surface is one, and others include the elliptical hyperboloid and hyperbolic paraboloid shown below.


    It is also very interesting that when a curved surface like this can be constructed from straight lines, it also has other straight lines that cross one such set of lines. That can be seen in Wave, as highlighted in the image below.(2) The question of the symmetry of the sculpture is a tantalizing one, becuase there is not a mirror symmetry along the central red line in the in the above picture (since a hump that is high on the left is low on the right and vice versa) nor is there a rotational symmetry around a vertical axis.  But, since each individual line runs through the central red line, there is a 180-degree rotational symmetry about that axis, which brings every one of the beams back to coincide with itself.

    (3) The secret to the different slopes of the different copper beams lies under the sculpture just to the left of the triangular support seen in the image above. If you peer under there, you will see a strut attaching to each beam, which otherwise can pivot at the central red line. Each of those struts is at a different height, and that height sets the slope of the corresponding beam. So as you peer under there, you will see the wave pattern of the entire sculpture replicated in those struts. In fact, there’s a mechanism inside the sculpture which allows each of those struts to move up and down, animating the entire sculpture.

  • Hillcrest Amphitheater

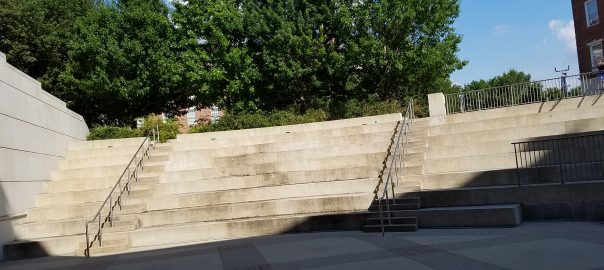
    Here are three quick questions concerning the Hillcrest Amphitheater in the Lyle School of Engineering on the campus of Southern Methodist University. First, if you laid a plank of wood on top of the seats, and another plank on top of the steps, and a third on top of the hand rails, which would have the greatest slope? Second, what fraction of a circle does the the amphitheater take up? Third, what point in the amphitheater is equidistant from the entire first row of seats?

    These questions should work well to spark geometric conversations among tour participants. Try to allow them time to come to their own answers. When the group discussions have completed, come together and see if you agree with the following conclusions:

    On the first, all of the planks will have the same slope. The railing is parallel to the steps because it is always the same height above the steps (all of the support posts are the same height), and parallel lines have the same slope. Also, from the picture we can see that each step is one-third the height of each of the seats, and if you measure, you will find that each one is also one-third the depth. Therefore the slope, which is the rise (or the height) divided by the run (or depth) is the same for the steps as the seats.

    On the second, we can see (although not in the above picture) that the amphitheater is tucked between two adjacent walls of the building it is attached to. Since building walls are generally placed at right angles, we conclude that the amphitheater is a quarter circle.

    On the third, how do we even know there is a point equidistant from all of the seats in the first row? Well, each row is a circular arc, and that’s exactly what a circle is, the set of points equidistant from a single point, the center of the circle. So we need to find the center of the amphitheater circle. For that, we can use the principle that the center of a circle is the intersection of any two radii. Harkening back to the previous question, notice that the two walls of the building defining the two boundaries of the amphitheater are necessarily radii of the amphitheater. So armed with the map below, we can see that the point we’re looking for is actually inside the building — not as good a place to address a crowd at Hillcrest Amphitheater about the wonders of math as we might have hoped!

  • Class of 1916 Sundial

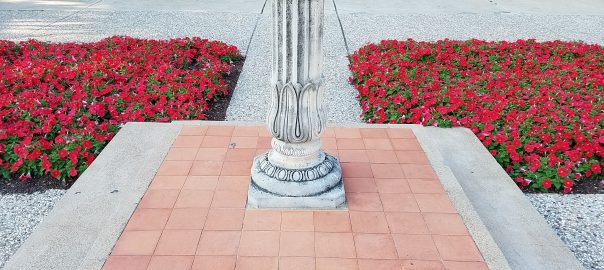
    Directly in front of Dallas Hall is the Class of 1916 Sundial. But over the years it has developed a problem: there’s nothing on it to cast a shadow! The piece that’s missing is called the style — a thin rod whose shadow lines up with one of the hour markings on the face of the sundial. Fortunately, you can use any relatively thin, straight object, like a pen from your pocket,  as a substitute style, as long as you put it in the correct place. If you look at the top of the sundial, it’s pretty clear where the style was attached (the center of the disk), but how do we know what angle we should hold the pen at? Clearly it will cast a shadow in a different place depending on the angle.

    Answering this question just requires a little bit of information about how a sundial works, and a little bit of geometry. The easiest sundial to imagine is one sitting exactly at the North Pole with its style pointing straight along the axis of the Earth’s rotation  and its face flat on the ground (well, or icecap). Over the scale of one day, the Sun is pretty close to fixed in space relative to the Earth, so as the Earth rotates, the shadow of the style falls successively on different points on the face of the sundial, allowing us to tell the time. (In fact, during the summer at the North Pole, you can use such a sundial 24 hours a day. And what’s more, because the Earth rotates counterclockwise when viewed from the North Pole, the shadow will appear to move clockwise on the face of the sundial, which is where the “clockwise” direction came from in the first place!) This diagram should make things a little clearer:If you now imagine moving that sundial anywhere else on the globe (Dallas, say), it will work the same way as long as that shadow-casting rod, the style, remains pointing in the same direction in space (parallel to the Earth’s rotational axis). That means the style will not be perpendicular to the ground at any other location (except for the South Pole), although it will always point due North. For example, at the Equator, the style would be exactly parallel to the ground (and the shadow would move horizontally across the dial, which would have to be mounted below the style so that the style actually casts a shadow).  That would look something like the below, which is in a garden in Singapore, a city that lies very nearly on the Equator.What about between the Equator and the North Pole? What angle should the style make with the ground? This diagram of a cross section of the Earth should help make that clearer.Because the ground direction is perpendicular to an imaginary line to the center of the Earth, the angle between the style and the ground at D is complementary to the angle shown in blue. But because the triangle shown with the dotted line is a right triangle, the angle in blue is also complementary to the angle that D makes with the Equator at the center of the Earth. So since they’re complementary to the same angle, the style angle is equal to the angle that D makes with the Equator. But that angle has a familiar name that makes it easy to look up: it’s called the latitude at the point D. So if D is Dallas, then we can look up the latitude as (approximately) 33°, and then lets us know to angle our pen-as-style at 33 degrees to the ground to read off the time. Oh, and don’t forget: the Sun doesn’t go on daylight savings time, so if that’s in effect, subtract an hour from the indicated time.

  • Blanton Student Services Building Exterior

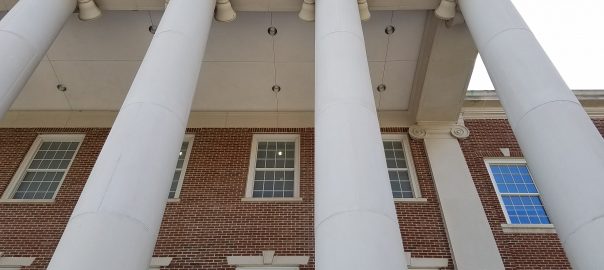
    The front of the Blanton Student Services Building poses a geometric puzzle. Or rather, the columns do: are the sides of the columns vertically straight, or do the columns become narrower as they go up? Of course, they appear narrower toward the top, but everything looks smaller the farther away it is. So how can we tell whether it’s just appearances or the columns are actually narrowing?

    (As an aside, you might wonder why columns would be built narrower toward the top? As you can read in this article, people have been building columns this way for milllennia, but it remains a bit of  a mystery as to why.)

    In any case, with a bit of measuring, geometry, and careful photography, we can settle the issue for these particular columns. The first thing to notice is that the columns are centered in the large stone blocks at the top of the building, and the edges of those blocks line up with the pairs of lights in the roof over the porch, and those lights in turn line up with the center lines of the windows. So to get the separation of the columns (center to center) we can just measure the horizontal distance at the ground between the center lines of two adjacent windows.

    Next, you can measure the diameter of the columns at the ground relatively easily, either by wrapping a cord around them once , measuring the cord, and dividing by pi, or by using straightedges (like yardsticks) to carry extreme points of one of the columns forward to the edges of the pedestal and measuring the distance between them. (If you do it this way, be careful to keep your straightedges parallel.)

    You will discover that the diameter of the columns at the ground is a little over one-third of the separation between the columns, which is equal to the width of the large stone blocks at the top. Now, a careful blowup of a section of the above photograph (which was carefully taken from directly in front of one edge of a column) will show whether at the top of the column the column is wider than the space to  its left to the edge of the block, which it would have to be if it remains larger than one third of the width of the block. Let’s see:The two red strokes added to the photo are both the same length, so you can plainly see that at the top, the width of the column is less than one third of the width of the stone block. Hence, the architect of these columns decided to use the classical technique of having them become narrower toward the top, rather than giving the columns straight vertical sides. Mystery solved!

    As a follow-up activity, you can have participants guess how tall the columns are, and then measure them by measuring the bottommost vertical section, and multiplying by the number of vertical sections.

    You now actually have enough information to calculate the weight of each of the columns. Use the volume formula in terms of radius and height for a cylinder (even though we figured out they are not precisely cylinders, you’ll still be close; in fact, you’ll be exact if you use the average radius between the top and bottom of the columns). Then look up the density of concrete, multiply, and convert units. I ended up with each column weighing very roughly 25 tons or about the weight of a dozen cars.